Power Bank benchmarks

This is a personal test for 5 different power banks that I buy:No brand 2200mA power bank

  • ROMOSS Sense 9 25000mA;
  • TP-LINK TL-PB15600 15600mA;
  • EC Technology PB-EC001 16000mA;
  • MediaRange MR751 5200mA;
  • No brand 2200mA.

This test here all done with:KCX-017 USB Power Meter

  • To meter the consumption I use a power meter KCX-017;
  • For charging Charger 5V, 3A;
  • For discharging I use a tablet Chuwi Hi10Pro (Android and Windows 10 tablet) that charges with a USB charging (playing YouTube HD/Full HD videos to drain the battery).

CHUWI Hi10 Pro
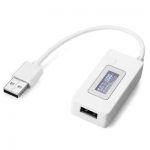
I’ve tested 5 different power banks, 4 of them Chinese (ROMOSS Sense 9, TP-LINK TL-PB15600, EC Technology PB-EC001, and a simple powerbank with a 18650 battery) and one german (MediaRange MR751). All were tested with the same KCX-017 USB meter and add the amount of 20 mA per hour of consumption in my measures.

When I was charging I use the KCX-017 to measure the Voltage and the current of the circuit with the same AC/DC power adapter that can give 5V 3A.

Testing PowerBanks

I’ve measured the time and the TOP power provided when I’ve charge the power banks and here is the results:

Capacity versus Reality (mA)MediaRange MR751 power bank

PowerBank: Capacity vs Reality

Capacity vs Reality (mA)

In this table I add 20mAh for the meter.

Output top powerEC Technology PB-EC001 power bank

Output Power Chart
Output Power TOP

Power = Max(V*A)

Charging time

Power banks charging time

Charging with a 5V, 3A (max) USB power adapter.

Power = Max(V*A)

Final results and opinion:

romoss sense 9 power bank
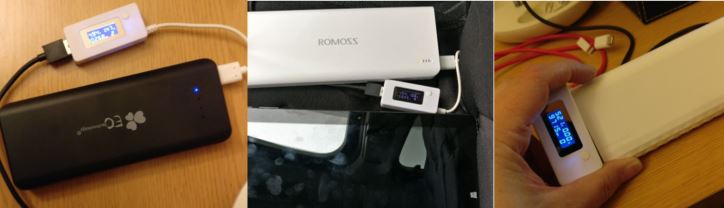
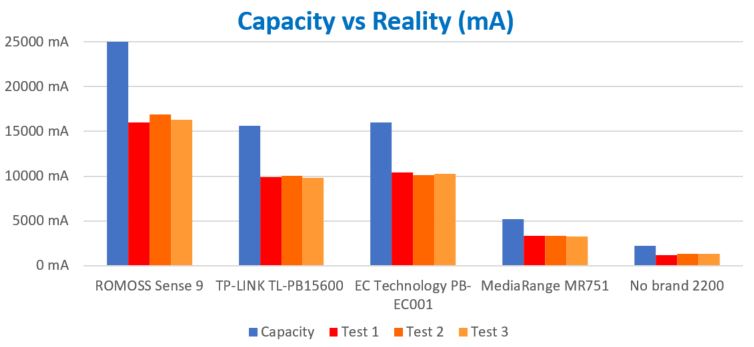
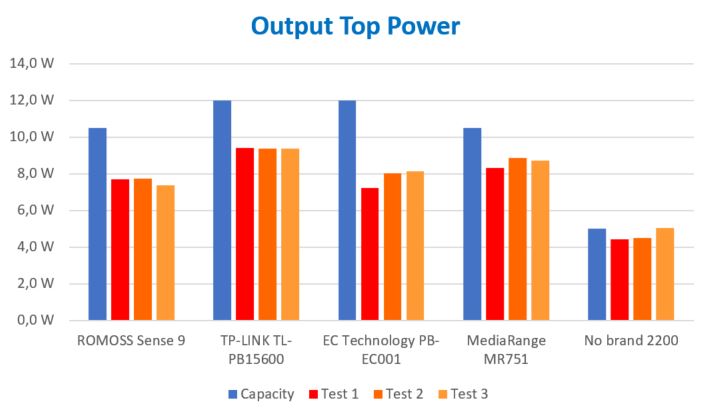
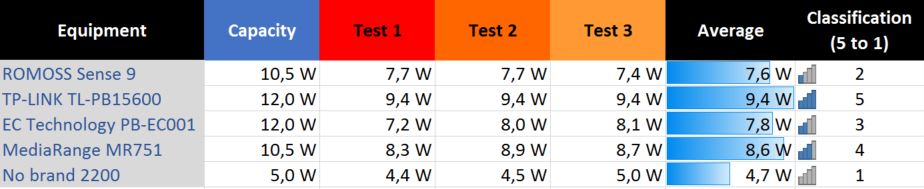
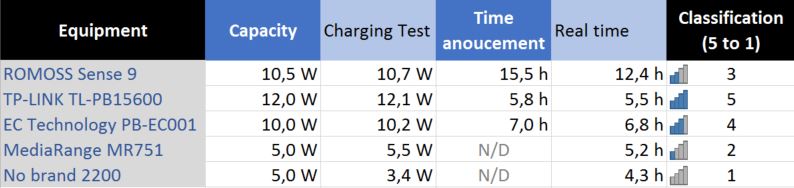
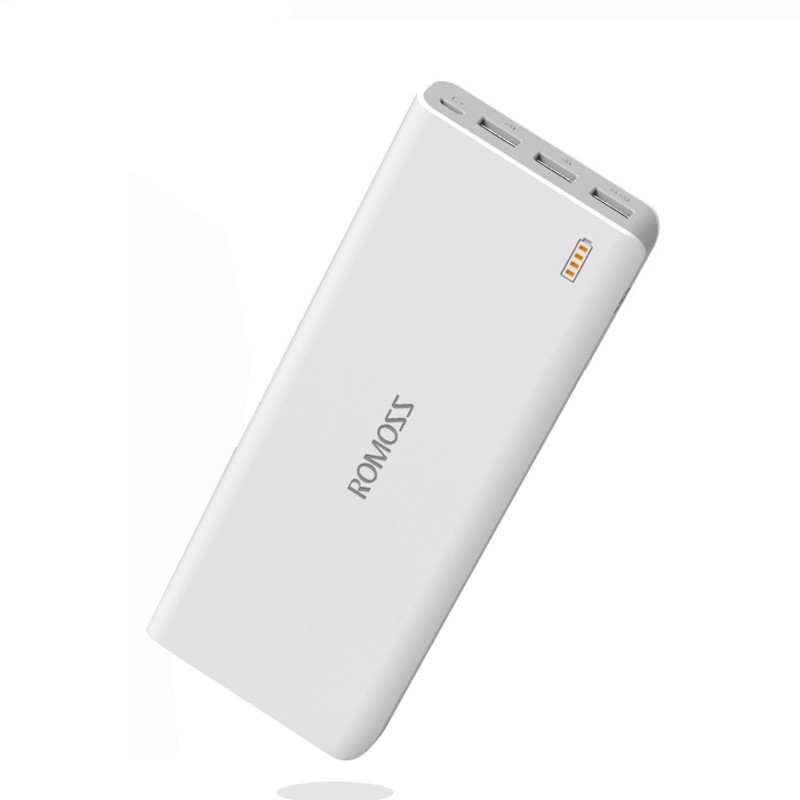
The most efficient was the one with the highest capacity with almost 66% of efficiency (ROMOSS Sense 9). Meanwhile, the one who charges faster the equipment that it is plugged and charges faster it (capacity vs time) is the TP-LINK TL-PB15600 who makes the winner of these tests.
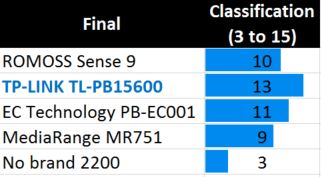
power bank final resultsTP-LINK TL-PB15600 power bank


Parrot MINIKIT NEO 2 HD vs Parrot MINIKIT +

Parrot Minikit PlusThis is my second review 🙂

This two portable bluetooth carkit are very similar, but the NEO 2 has more features but it will cost more… In my opinion this two are a very good devices 😉


Parrot Minikit PLUS: https://www.parrot.com/uk/node/4#parrot-minikit-

Parrot Minikit NEO 2 HD: https://www.parrot.com/uk/car-kits/parrot-minikit-neo-2-hd 


https://youtu.be/vi1JNs6O9kg


Parrot Minikit NEO 2 HD:

  • Dual Mode (Multipoint): connect two Bluetooth phones simultaneously
  • Number of contacts: 2,000 per phone – Total of 20,000 contacts maximum
  • Language: one language per version
  • Pairing capacity : maximum of 10 devices
  • Battery: Lithium Ion – 1000mAh
  • Battery life: – up to 10 hours in conversation, up to 15 days in stand-by , up to 6 months in Ultra Low Power Mode
  • Charging time: 3 hrs (0% to 100%) 5V / 500mA
  • Easy Pairing Process
  • Automatic connection by pairing order
  • 3W speaker, full duplex, output via vibrating panel, noise reduction, echo cancellation, voice prompts for all menus, advanced voice recognition, natural sounding Text-To-Speech (reads the names in the phonebook – not the text message – this functionality is from the phone)
  • Bluetooth v4.0 (HFP 1.6 (Hands Free Profile) – A2DP (Advanced Audio Distribution Profile) – PBAP (Phone Book Access Profile), SyncML – Synchro AT – Synchro Nokia)
  • Bluetooth range: 10 meters maximum – 32 feet maximum (on the test that I made it fails on ~20 meter)
  • SIP6 processor at 416 MHz, Flash memory: 128MB (1Gb), RAM memory: 32MB (256Mb) – DDR
  • PACKAGE CONTENT: 1x Parrot MINIKIT Neo 2 HD, 1x USB / micro-USB cable, 1x Cigar lighter charger – USB out, 1x Quick Start Guide
  • DIMENSIONS & WEIGHT: Length: 95mm / 3.74 in, Width: 54 mm / 2.12 in, Thickness: 45mm / 1.77 in, Weight: 67 gr / 2.36 oz
  • Interact with an APP for Android & IOS systems


Parrot Minikit Plus:

  • Dual Mode (Multipoint): connect two Bluetooth phones simultaneously
  • Number of contacts: 2,000 per phone – Total of 20,000 contacts maximum
  • Language: one language per version
  • Pairing capacity : maximum of 10 devices
  • Battery life: – up to 12 hours in conversation, up to 6 months in Ultra Low Power Mode
  • Charging time: 3,5 hrs (0% to 100%) 5V / 500mA
  • Automatic connection by pairing order
  • Full duplex, built-in omnidirectional microphone, audio output via the vibrating panel, noise reduction, APA echo cancellation, voice menus for all menus, advanced voice recognition, Text-to-Speech: speech synthesis of the names in the phonebook (reads the names in the phonebook – not the text message – this functionality is from the phone)
  • Bluetooth: v2.1 + EDR, HFP (Hands Free Profile), OPP (Object Push Profile), PBAP (Phone Book Access Profile), A2DP (Advanced Audio Distribution Profile), SyncML, Synchro AT, Synchro Nokia
  • Range: 10 metres (on the test it fails on ~8 meters, and sometimes less than that)
  • Parrot P6i @ 416 MHz, Flash = 1 Gbits, RAM = 128 Mbits
  • PACKAGE CONTENT: 1x Parrot MINIKIT +, 1x USB / mini-USB cable, 1x Cigar lighter charger – USB out, 1x Quick Start Guide + 1x Belt
  • DIMENSIONS & WEIGHT: Length: 109 mm / 4.3 in, Width: 61 mm / 2.4 in, Thickness: 28 mm / 1.1 in, Weight: 83 gr / 2.93 oz

Unboxing and review TP-LINK HS110 (long test)

TP-LINK HS110

This was my first Unboxing and Review that I made. I’ve unboxing and test the SmartPlug TP-LINK HS110 with energy monitoring. I hope it will be usefull for you.


https://youtu.be/WltuR0k_3ws

After 2 weeks of testing, I strongly recommended this product:

https://youtu.be/Nso766B1J4c


I recomend and give a 5 stars (5/5) for this product.

Sorry for my terrible English on this videos 😉

How to choose a computer “for dummies”

for_dummiesThis is one of my articles, not based on anything, but in my experience and opinion.

pc-gaming

Many users less informed are being eluded by de hard drive capacity, memory capacity, graphic card memory capacity, number of cores of the processor (CPU) or the velocity in GHz (number of instructions per second).
This specs aren’t important. You can get in our days a low computer with 1TB (1.024 GB) of hard drive, 8GB of RAM, 2GB of memory card and a 3GHz processor with 8 cores.
And do you ask… How should I choose my computer?
You always should het this specs in consideration: CPU, RAM, Hard Drive and Graphic Card (this one if you pretend to run the last high ended and popular games). Continue reading “How to choose a computer “for dummies””

CISCO CCENT NetRides 2015 – 20º lugar nas competições mundiais

Mais um ano que a ATEC compete nas competições da CISCO e mais um ano a ficar bem posicionada.

No dia 23 de Abril 28 formandos na ATEC (Porto e Lisboa) foram a competição Nacional, sendo que 5 foram destacados para representar Portugal no mundial de 2015.

2015-04-22-participantes
Participantes da ATEC – Porto no dia da competição

Continue reading “CISCO CCENT NetRides 2015 – 20º lugar nas competições mundiais”

How to Run a Portable Version of Windows XP, 7, 8, 8.1 from a USB Drive

Windows USB
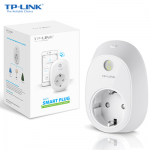
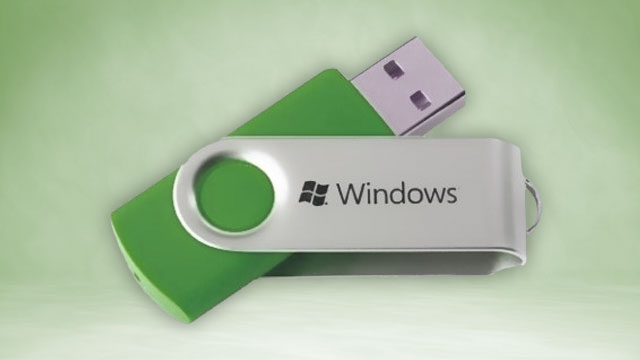
You ever wanted a Windows to run on a USB hard drive or flash drive, to use on any computer you want? It’s possible :-D. Thanks to WinToUSB.
Here’s how to install a portable version of Windows 8.1 (or other versions, like Windows XP or 7) on a USB hard drive that you can take anywhere.
Note that this is different from installing Windows from a USB drive, which allows you to install Windows on a computer that doesn’t have a CD drive (for that, please check this post). Here, we’re actually installing Windows on a USB drive so we can run it from a drive on any computer you want, and take it with you for troubleshooting, remote work, and so on.

You only need:
  1. A Microsoft Windows installation disc or ISO image – We recommend using Windows 8, that will allow you to use your portable installation on any computer. Microsoft Windows 7 is not as portable and may have driver or activation issues if you use it on other computers.
  2. A USB drive – An external hard drive or a flash drive. USB 2.0 is not recomended (slower). A USB 3.0 driveis the best technology for this end (mutch faster).
  3. WinToUSB – This is the simple program that will walk you through the installation process. Download it from here.
Installation:

This is a very easy to do… Only choose the ISO sourse, the destination disk, and configure the system partitions.

Check it on WinToUse: http://www.easyuefi.com/wintousb/index.html

On my PC it only takes less than 20 minutes, but I’ve read that some users wait an hour to do it.

You will need to make 2 partitions (system partition with +-300MB and a boot partition with the space that you desire – more than 30GB is recomended for Windows 8). You can check this page: http://www.easyuefi.com/wintousb/faq/en_US/What-are-system-partitions-and-boot-partitions.html for more information.


References:

http://lifehacker.com/how-to-run-a-portable-version-of-windows-from-a-usb-dri-1565509124

http://www.easyuefi.com/wintousb/

Samsung Gio (GT-S5660) CM9 – Android 4.0.4

Samsung Galaxy Giocm9After I try to update to CM11 (Android 4.4.2) and see that is not working properly (KitKat is too big for this phone) I decided to install CM9 (Android 4.0.4 IceCream Sandwich) instead.

First you need to know that with this process you will avoid the warranty for your device, and you will do it on your own… I can’t be responsible for the damage that it will eventually do to your device.

I tested in my old device that I brought in 2011 with success. Only the camera doesn’t work.


1 – Root your Gio With Gingerbread 2.3.3:
  1. Download: Update.zip
  2. Copy ZIP file to your SD-card
  3. Turn off your phone
  4. Now, you will have to switch ON your device in the recovery Mode which can be done by holding the Middle button and then Power ON the device by pressing the Power ON button.
  5. In recovery mode, you will see the option called “apply update from SD Card”, select this option and then you will see that the list of files will come from which you will have to select the file which is named as Update.zip
  6. Wait a few seconds (MAX 5 minutes!)
  7. Your phone is rooted


2 – Install ClockworkMod Recovery

The next obvious step after rooting an Android device is flashing a custom Recovery Image. A custom recovery not only helps you flash custom ROMs, but it lets you take backups of your current ROM so in case you mess up with your device, you can easily revert back to the working firmware. The widely popular ClockworkMod Recovery’s available for the Galaxy Gio and the guide below shows how you can install it on your device. Here you go:

  1. You must have rooted your device before doing this procedure.
  2. This will replace your current recovery with the CWM Recovery.
  3. Download the ClockworkMod Recovery CWM 5.0 v2 and copy to the Root (not in any folder) of your SD card
  4. Put your phone in recovery Mode(press: Home button + Power button toghether)
  5. In recovery mode, select the downloaded file “apply update from SD Card”(Use Volume keys to navigate and home button for enter).
  6. Search for the file downloaded “.zip” on your SD-card
  7. Run the update
  8. Reboot

https://www.youtube.com/watch?feature=player_embedded&v=hxjxB8P9rSU

You’ve successfully installed the ClockworkMod Recovery on your device and you should be able to flash custom ROMs and Mods right away!


3 – Flash a CM9 – Android 4.0.4
  1. From this page download the CM 9 firmware file. The password for rar file is www.androidpt.com
  2. Save the Android 4.0.4 OS (cm_9_final3gio-ota-eng.zip) on your computer – just place the file on desktop without unzipping it.
  3. Now, connect your handset with the PC by plugging in the USB cord.
  4. Then transfer the downloaded files from desktop on your phone’s SD card.
  5. Remove the USB cable; the computer is no longer useful.
  6. Turn off your Galaxy Gio.
  7. Enter your Android device in recovery mode.
  8. From recovery select “wipe data factory reset”.
  9. Now return to main menu of recovery.
  10. Up next you have to select “install zip from SD card” followed by “choose zip from SD card”.
  11. Select the cm_9_final3gio-ota-eng.zip; flash the update on your Samsung Galaxy Gio.
  12. Then from the main menu of recovery you need to select “reboot system now” and you are done.

Perfect. You have learned how to safely update your Samsung Galaxy Gio to Android 4.0.4 OS. CM9 custom ROM firmware has been installed on your Android device, so you are done for now. Just give it a try and test the new software.

References:

http://forum.xda-developers.com/showthread.php?t=1111414

http://forum.xda-developers.com/showpost.php?p=20397988&postcount=8

http://www.androidpt.com/index.php?/topic/47870-mudan%C3%A7a-de-rom-do-gio-para-vers%C3%A3o-404/

http://theunlockr.com/2013/03/20/how-to-root-the-samsung-galaxy-gio-gt-s5660/

http://theunlockr.com/2013/03/20/how-to-install-clockworkmod-recovery-on-the-samsung-galaxy-gio-gt-s5660/